Table of Contents
Creating a Python package is an essential skill for developers who want to organize their code, share it with others, or reuse it in different projects. Python packages allow you to bundle your code in a structured way, making it easy to distribute and install. Whether you are building a utility, a library, or a full-fledged framework, packaging your Python code can help make it more accessible and maintainable.
This guide will walk you through the process of creating a Python package from scratch, covering everything from the basic folder structure to publishing it on PyPI (Python Package Index).
1. Understanding Python Packages
Before diving into the creation process, let’s clarify what a Python package is. In Python, a package is essentially a collection of modules, organized in a directory, with an __init__.py file in it. This file signals to Python that the directory should be treated as a package, and it may contain package initialization code.
Modules, on the other hand, are simply Python files containing code (functions, classes, variables) that you can import and reuse in other scripts.
Why Use Python Packages?
- Modularization: By breaking your code into smaller, reusable modules, you can reduce duplication and improve maintainability.
- Code sharing: Packaging your code allows others to easily install and use it in their projects.
- Versioning: You can release different versions of your package, allowing users to upgrade as needed.
- Namespace organization: Packaging helps to avoid name conflicts by organizing your code within namespaces.
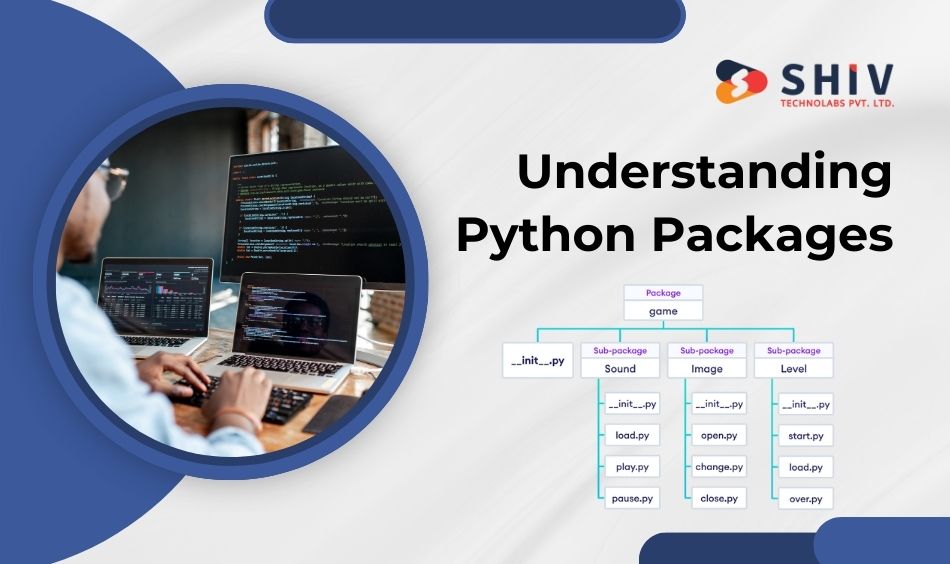
2. Basic Folder Structure of a Python Package
The first step in creating a Python package is organizing your files and directories. A typical Python package structure looks like this:
/mypackage/
/mypackage/
__init__.py
module1.py
module2.py
tests/
test_module1.py
test_module2.py
setup.py
LICENSE
README.md
requirements.txt
Let’s break down the key components:
Main Package Directory
This directory contains the actual package code. Inside it, you’ll find:
- __init__.py: Marks this directory as a package. It can be empty or contain initialization code.
- module1.py, module2.py: These are Python files that contain the functionality of your package. You can have as many modules as you need.
Tests Directory
It’s a good practice to include tests in your package to ensure that everything works as expected. Each module should have corresponding test files, for example, test_module1.py for module1.py. Tools like pytest or unittest can be used to run these tests.
setup.py
This file contains the metadata about your package and instructions on how to install it. It’s the most critical file when it comes to building and distributing your package.
LICENSE
It’s important to specify the terms under which your package can be used by others. Common licenses include MIT, GPL, and Apache 2.0. Choose the one that best fits your needs.
README.md
This file is used to provide information about your package. It typically includes a description of what the package does, how to install it, and examples of how to use it.
requirements.txt
This file lists the dependencies required by your package. When someone installs your package, these dependencies will also be installed.
3. Writing Your Package Code

Now that you have the folder structure in place, let’s start writing the code for your package.
Step 1: Create __init__.py
The __init__.py file is a special file that Python uses to mark a directory as a package. It can be empty or contain initialization code. If you want certain modules or functions to be directly accessible when the package is imported, you can import them here.
Example:
# mypackage/__init__.py

from .module1 import some_function
from .module2 import AnotherClass
Now, when someone imports your package, they can access some_function and AnotherClass directly:
import mypackage

mypackage.some_function()
Step 2: Create Module Files
Next, create the actual functionality of your package in separate module files.
For example, let’s say you are building a simple package that provides mathematical operations.
# mypackage/module1.py

def add(a, b):
return a + b

def subtract(a, b):
return a - b
# mypackage/module2.py

class Calculator:
def multiply(self, a, b):
return a * b

def divide(self, a, b):
if b == 0:
raise ValueError("Cannot divide by zero")
return a / b
4. Creating the setup.py File
The setup.py file is the heart of your package. It contains the metadata and instructions required for distributing and installing your package. Here’s a basic example:
# setup.py

from setuptools import setup, find_packages

setup(
name="mypackage",
version="0.1",
author="Your Name",
author_email="youremail@example.com",
description="A simple example Python package",
long_description=open('README.md').read(),
long_description_content_type="text/markdown",
url="https://github.com/yourusername/mypackage",
packages=find_packages(),
classifiers=[
"Programming Language :: Python :: 3",
"License :: OSI Approved :: MIT License",
"Operating System :: OS Independent",
],
python_requires='>=3.6',
install_requires=[
# Add any dependencies here
"requests",
],
)
Let’s break down the key elements:
- name: The name of your package.
- version: The current version of your package.
- author, author_email: Your name and contact email.
- description: A short description of your package.
- long_description: A detailed description, typically pulled from your README file.
- url: The URL of your package’s repository or homepage.
- packages: A list of all Python import packages that should be included. The find_packages() function will automatically find them for you.
- classifiers: These are used to categorize your package on PyPI.
- python_requires: Specifies the minimum Python version your package supports.
- install_requires: A list of external dependencies required by your package.
5. Testing Your Package Locally
Before distributing your package, it’s important to test it locally. You can do this by installing it in “editable” mode.
Navigate to the root directory of your package (the one containing setup.py).
Run the following command:
pip install -e .
The -e flag stands for “editable,” meaning any changes you make to the package will be reflected immediately.
You can now import your package in Python and test it:
import mypackage

mypackage.some_function()
6. Adding Unit Tests
Good packages come with tests. These ensure that your code behaves as expected and helps other developers understand how to use it.
You can use unittest, pytest, or another testing framework of your choice. Here’s a simple example using unittest:
# tests/test_module1.py

import unittest
from mypackage.module1 import add, subtract

class TestMathOperations(unittest.TestCase):
def test_add(self):
self.assertEqual(add(1, 2), 3)

def test_subtract(self):
self.assertEqual(subtract(5, 3), 2)

if __name__ == "__main__":
unittest.main()
You can run the tests by simply executing:
python -m unittest discover
7. Building and Publishing Your Package
Once you’re satisfied with your package, it’s time to distribute it. Python packages are commonly published on PyPI, the Python Package Index. Here’s how you can do it:
Step 1: Install Necessary Tools
You’ll need setuptools and twine to build and upload your package:
pip install setuptools twine
Step 2: Build the Package
Run the following command to build your package:
python setup.py sdist bdist_wheel
This will generate distribution archives in the dist/ directory.
Step 3: Upload to PyPI
First, create an account on PyPI. Then, upload your package using twine:
twine upload dist/*
You’ll be prompted to enter your PyPI credentials. After the upload is successful, your package will be available on PyPI for others to install using:
pip install mypackage
8. Versioning and Updating Your Package
Versioning is an important aspect of package development. Follow semantic versioning guidelines to manage your package versions:
MAJOR.MINOR.PATCH
- Major: Significant changes, often breaking backward compatibility.
- Minor: New features, but backward-compatible.
- Patch: Bug fixes and small improvements.
To update your package, simply change the version number in setup.py, rebuild the package, and upload it to PyPI again.
Conclusion
Creating a Python package may seem daunting at first, but once you understand the process, it becomes straightforward. Packaging your code is not only a way to share your work with others but also a way to organize and manage your code more efficiently. By following the steps outlined in this guide, you’ll be able to package, distribute, and maintain your Python projects with ease.
If you’re looking to take your Python development to the next level, Shiv Technolabs is here to help. Whether you need to hire Python developers or hire Python experts, our team can provide the expertise to bring your project to life efficiently and effectively. Let us assist you in building high-quality Python solutions tailored to your specific needs!